
υπό ανάπτυξη
Μπουτόν συχνά δημιουργούν πλαστά ψεύτικα άνοιγμα / κλεισίματα μεταβάσεις όταν πιέζεται, λόγω μηχανικών και φυσικών θεμάτων: αυτές οι μεταβάσεις ή οι αναπηδήσεις του μπουτόν μπορεί να διαβαστούν ως πολλαπλά πατήματα σε ένα πολύ σύντομο χρονικό διάστημα και μπορεί να κοροϊδεύουμε ή να μπερδέψουμε το πρόγραμμα. Αυτό το παράδειγμα δείχνει πώς να κάνουμε debounce στο μπουτόν σε μια είσοδο του arduino, που σημαίνει ;ότι θα κάνουμε τον έλεγχο δύο φορές σε σύντομο χρονικό διάστημα για να βεβαιωθεί ότι το κουμπί σίγουρα πιέζεται από κάποιο ανθρώπινο χέρι. Χωρίς debouncing, πατώντας το κουμπί μία φορά μπορεί να προκαλέσει απρόβλεπτα αποτελέσματα. Αυτό το σκίτσο χρησιμοποιεί τη συνάρτηση χιλιοστά δευτερολέπτου () για να παρακολουθεί το χρόνο που μεσολάβησε από τη χρονική στιγμή που πατήθηκε το κουμπί.
Απαιτούμενα υλικά
- Arduino uno
- momentary button or switch
- 10k ohm αντίσταση
- hook-up wires
- breadboard
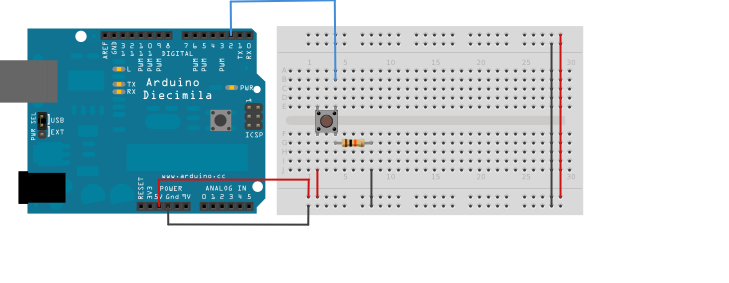
To κύκλωμα στο breadboard
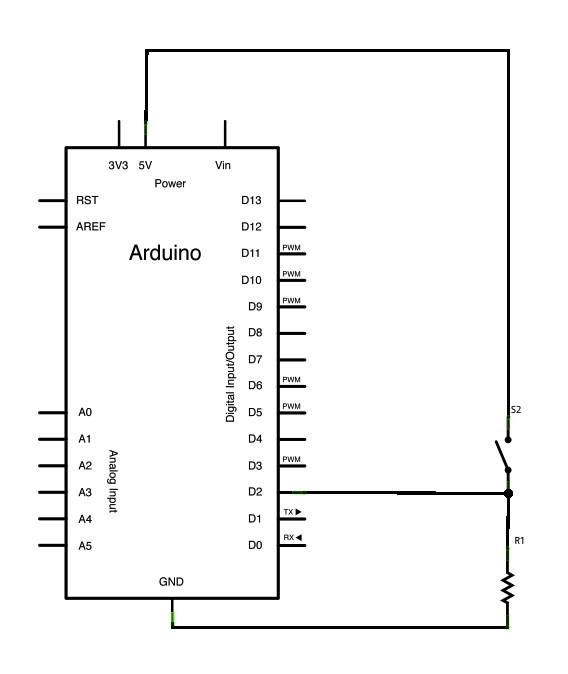
Το σχηματικό
Ο κώδικας
Το παραπάνω σκίτσο βασίζεται στην έκδοση του debounce της Limor Fried, αλλά η λογική είναι ανεστραμμένη από το παράδειγμα της. Στο παράδειγμά της, ο διακόπτης επιστρέφει LOW όταν είναι κλειστό, και HIGH όταν είναι ανοικτά. Εδώ, ο διακόπτης επιστρέφει HIGH όταν πιέζεται και LOW, όταν δεν πιέζεται.
Η ακίδα 2 είναι ψηφιακή και θα ορισθεί ως είσοδος
Στην ακίδα 13 υπάρχει ένα led για να βλέπουμε οπτικά τα πατήματα του μπουτόν
Θα ορισθεί και η απαιτούμενη χρονική καθυστέρηση για τον επανέλεγχο της θύρας 2 σε 50 ms που αποθηκεύεται στη μεταβλητή debounceDelay
/*
  Debounce
 Κάθε φορά που η είσοδος ακίδα 2 πηγαίνει από LOW σε HIGH κατάσταση (π.χ. διότι πιέζω το μπουτόν), η έξοδος ακίδα 13 κάνει εναλλαγή από LOW σε HIGH ή από HIGH σε LOW. Υπάρχει μια ελάχιστη καθυστέρηση μεταξύ εναλλαγών  to debounce the circuit (π.χ. αγνόηση θορύβων).

  Tο κύκλωμα:
  * LED attached from pin 13 to ground
  * pushbutton attached from pin 2 to +5V
  * 10K resistor attached from pin 2 to ground

  * Σχόλια: Στις περισσότερες πλακέτες Arduino, υπάρχει είδη ένα LED πάνω στην πλακέτα συνδεδεμένο στην ακίδα 13, έτσι δεν χρειάζεται επιπλέον εξαρτήματα για αυτό το παράδειγμα.

  created 21 November 2006
  by David A. Mellis
  modified 30 Aug 2011
  by Limor Fried
  modified 28 Dec 2012
  by Mike Walters

  This example code is in the public domain.

  http://www.arduino.cc/en/Tutorial/Debounce
  */

 // constants won't change. They're used here to
 // set pin numbers:
 const int buttonPin = 2;    // the number of the pushbutton pin
 const int ledPin = 13;      // the number of the LED pin

 // Variables will change:
 int ledState = HIGH;         // the current state of the output pin
 int buttonState;             // the current reading from the input pin
 int lastButtonState = LOW;   // the previous reading from the input pin

 // the following variables are long's because the time, measured in miliseconds,
 // will quickly become a bigger number than can be stored in an int.
 long lastDebounceTime = 0;  // the last time the output pin was toggled
 long debounceDelay = 50;    // the debounce time; increase if the output flickers

 void setup() {
   pinMode(buttonPin, INPUT);
   pinMode(ledPin, OUTPUT);

   // set initial LED state
   digitalWrite(ledPin, ledState);
 }

 void loop() {
   // read the state of the switch into a local variable:
   int reading = digitalRead(buttonPin);

   // check to see if you just pressed the button
   // (i.e. the input went from LOW to HIGH),  and you've waited
   // long enough since the last press to ignore any noise:

   // If the switch changed, due to noise or pressing:
   if (reading != lastButtonState) {
     // reset the debouncing timer
     lastDebounceTime = millis();
   }

   if ((millis() - lastDebounceTime) > debounceDelay) {
     // whatever the reading is at, it's been there for longer
     // than the debounce delay, so take it as the actual current state:

     // if the button state has changed:
     if (reading != buttonState) {
       buttonState = reading;

       // only toggle the LED if the new button state is HIGH
       if (buttonState == HIGH) {
         ledState = !ledState;
       }
     }
   }

   // set the LED:
   digitalWrite(ledPin, ledState);

   // save the reading.  Next time through the loop,
   // it'll be the lastButtonState:
   lastButtonState = reading;
 }